¶ Integrations
The Integrations section connects the platform with your organization's email infrastructure, messaging platforms, and external services. Access it from the left sidebar.
This section has four tabs:
- Integrations — email delivery and messaging connectors
- Webhooks — real-time event notifications
- Domains — phishing domain management
- Reporting Settings — IMAP configuration for phishing report monitoring
¶ Integrations (Connectors)
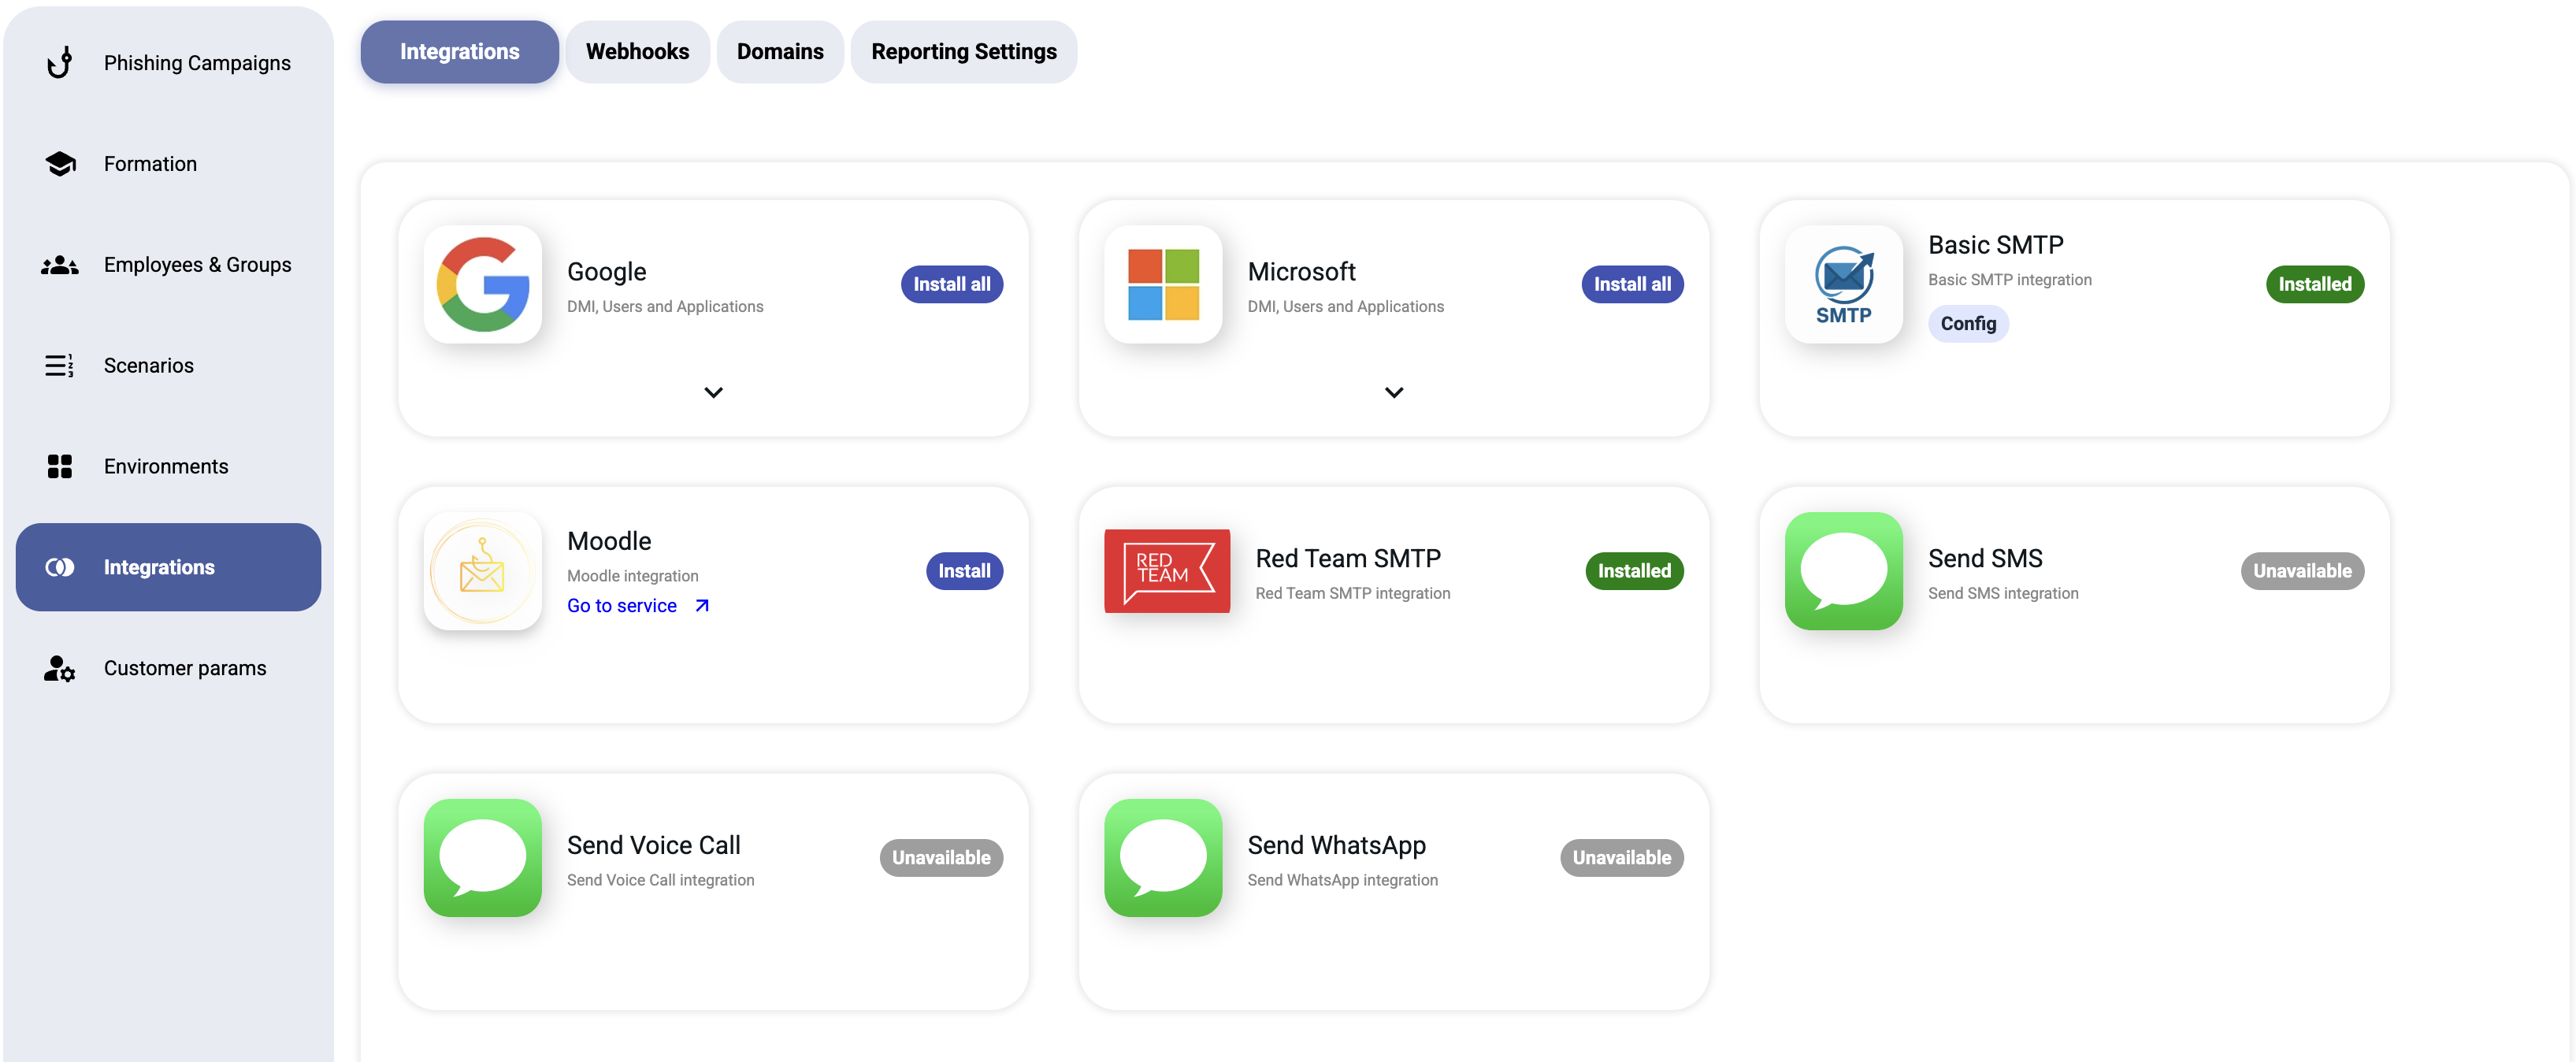
The Integrations tab shows all available connectors as cards. Each card displays:
- Logo and name of the service
- Brief description of what it does
- Status badge — Installed, Not installed, or Unavailable
¶ Available Integrations
¶ Email Delivery
| Integration | Description | Status |
|---|---|---|
| DMI (Direct Message Injection), user sync, and application management via Google Workspace APIs | Available | |
| Microsoft | DMI, user sync, and application management via Microsoft 365 APIs | Available |
| Basic SMTP | Standard SMTP relay for sending phishing emails through any mail server | Available |
| Red Team SMTP | Advanced SMTP integration for red team engagements with enhanced delivery features | Available |
¶ Training
| Integration | Description | Status |
|---|---|---|
| Moodle | Learning management system integration for security awareness training modules | Available |
¶ Messaging Channels (Future)
| Integration | Description | Status |
|---|---|---|
| Send SMS | SMS-based phishing simulations | Unavailable |
| Send Voice Call | Voice phishing (vishing) simulations | Unavailable |
| Send WhatsApp | WhatsApp-based phishing simulations | Unavailable |
Note: SMS, Voice Call, and WhatsApp integrations are planned features and not yet available.
¶ Google Integration
The Google integration enables:
- Direct Message Injection (DMI) — inject phishing emails directly into Gmail inboxes via the Gmail API, bypassing spam filters entirely
- User Sync — automatically import employee lists from Google Workspace
- Application management — manage OAuth scopes and permissions
Setup requires:
- A Google Workspace admin account
- Service account credentials with appropriate API scopes
- Domain-wide delegation enabled in Google Admin Console
Tip: DMI is the most reliable delivery method — emails appear directly in the inbox without passing through spam filters.
Safe Senders List — Update triggers
The Microsoft 365 safe senders list is automatically updated whenever an
environment is updated in the platform. This ensures that phishing
simulation emails are not blocked by M365 security filters.
Note: Any change to an environment (name, domain, landing page, etc.)
will trigger a safe senders list refresh on the connected M365 tenant.
¶ Microsoft Integration
The Microsoft integration enables:
- Direct Message Injection (DMI) — inject phishing emails directly into Outlook/Exchange inboxes via Microsoft Graph API
- User Sync — import employee lists from Microsoft 365 / Azure AD
- Application management — manage app registrations and permissions
Setup requires:
- A Microsoft 365 admin account
- An Azure AD app registration with Mail.ReadWrite permissions
- Admin consent granted for the application
Microsoft Whitelisting:
To ensure phishing simulation emails bypass Microsoft Defender, configure the Advanced Delivery policy:
- Go to Microsoft Security Portal → Email & Collaboration → Policies & Rules → Threat Policies
- Navigate to Advanced Delivery → Phishing Simulation tab
- Add the sending IPs and domains:
- IPs:
185.163.125.9,45.13.104.11,145.239.146.162 - Domain: the DKIM domain shown in Basic SMTP → Config settings
- IPs:
Important: The Advanced Delivery policy alone is often not sufficient — see the troubleshooting sections below for additional required steps.
¶ Troubleshooting: ATP Still Inspects Emails After Advanced Delivery Whitelisting
Even with the Advanced Delivery phishing simulation policy configured, Microsoft Defender ATP may still inspect simulation emails and generate false-positive tracking events — for example, spurious "Message Opened" records caused by Safe Links rewriting or Safe Attachments scanning. To fully bypass ATP inspection, you must create four Exchange transport rules in the Exchange Admin Center.
Go to: admin.cloud.microsoft → Exchange → Mail flow → Rules
Create the following four rules. Each rule uses the same condition: "The sender IP address is in any of these ranges" — 185.163.125.9, 45.13.104.11, 145.239.146.162 (platform sending IPs).
| # | Rule name | Action |
|---|---|---|
| 1 | Set spam confidence level to -1 | Set the spam confidence level (SCL) to −1 (bypasses spam filtering entirely) |
| 2 | Bypass Focused Inbox | Set message header X-MS-Exchange-Organization-BypassFocusedInbox to true |
| 3 | Skip Safe Links Processing | Set message header X-MS-Exchange-Organization-SkipSafeLinksProcessing to true |
| 4 | Skip Safe Attachments Processing | Set message header X-MS-Exchange-Organization-SkipSafeAttachmentProcessing to true |
Step-by-step: Create Rule 1 (Set spam confidence level to -1)
The wizard has three pages: Set rule conditions → Set rule settings → Review and finish.
- In the Exchange Admin Center, go to Mail flow → Rules → + Add a rule → Create a new rule
- Set rule conditions page:
- Name:
Set spam confidence level to -1 - Apply this rule if: choose The sender → IP address is in any of these ranges or exactly matches
- Add
185.163.125.9, click Add, then add45.13.104.11, click Add, then add145.239.146.162, click Add, then click Save - Do the following: choose Modify the message properties → set the spam confidence level (SCL) → select Bypass spam filtering
- Click Next
- Name:
- Set rule settings page:
- Deactivate this rule on: set to
01/01/2027 - Leave all other settings at their defaults
- Click Next
- Deactivate this rule on: set to
- Review and finish page: click Finish, then click Done
- Back on the Rules list, select the rule you just created and click Enable or disable rule to enable it (rules are created as Disabled by default)
Step-by-step: Create Rules 2, 3, and 4 (via Duplicate)
Rules 2–4 share the same IP condition as Rule 1. Use the Duplicate action to avoid re-entering it each time.
For Rule 2 (Bypass Focused Inbox):
- On the Rules list, select Set spam confidence level to -1, then click Duplicate
- In the Make a copy panel that opens on the right:
- Change the Name to
Bypass Focused Inbox - Under Do the following, change the action to Modify the message properties → set a message header → header:
X-MS-Exchange-Organization-BypassFocusedInbox, value:true - Click Make copy
- Change the Name to
- Select the new rule and click Enable or disable rule to enable it
For Rule 3 (Skip Safe Links Processing):
- Select Bypass Focused Inbox, then click Duplicate
- In the Make a copy panel:
- Change the Name to
Skip Safe Links Processing - Change the header to
X-MS-Exchange-Organization-SkipSafeLinksProcessing, value:true - Click Make copy
- Change the Name to
- Select the new rule and click Enable or disable rule to enable it
For Rule 4 (Skip Safe Attachments Processing):
- Select Skip Safe Links Processing, then click Duplicate
- In the Make a copy panel:
- Change the Name to
Skip Safe Attachments Processing - Change the header to
X-MS-Exchange-Organization-SkipSafeAttachmentProcessing, value:true - Click Make copy
- Change the Name to
- Select the new rule and click Enable or disable rule to enable it
Once all four rules are enabled, ATP will no longer inspect or modify simulation emails originating from the platform's sending IPs.
Note: Configuring Advanced Delivery alone is not sufficient. Without these transport rules, ATP will continue to rewrite Safe Links and scan attachments, producing false "Message Opened" events in campaign results.
¶ Troubleshooting: DMI Emails Still Moved to Junk by Outlook Clients
Even when delivered via DMI (which bypasses server-side spam filters), Outlook desktop and web clients apply their own client-side junk email rules. This can cause simulation emails to be silently moved to the Junk folder despite successful delivery. Two solutions are available:
Solution A — Bulk PowerShell (recommended for administrators)
Add the sender domain to all user mailboxes' trusted senders list via Exchange Online PowerShell. This updates the per-mailbox Outlook junk email configuration for every user in the organization.
$domains = @("your-dkim-domain.com")  # Use the DKIM domain shown in Basic SMTP → Config
$mailboxes = Get-Mailbox -RecipientTypeDetails UserMailbox -ResultSize Unlimited
foreach ($mb in $mailboxes) {
  try {
    Set-MailboxJunkEmailConfiguration $mb.Identity -TrustedSendersAndDomains @{Add=$domains}
    Write-Host "OK:" $mb.PrimarySmtpAddress
  } catch {
    Write-Host "ERROR:" $mb.PrimarySmtpAddress
  }
}
Run this in an Exchange Online PowerShell session authenticated with an account that has Exchange Admin permissions. The script iterates all user mailboxes and logs OK or ERROR for each one.
Solution B — CID image embedding (no admin rights required)
If you cannot modify mailbox junk settings organization-wide, use Content-ID (CID) attached images in your scenario templates instead of externally hosted images. Outlook's junk heuristics often flag emails that reference remote image URLs; embedding images as CID attachments avoids this trigger.
In your scenario HTML template, replace external image tags with CID references:
<!-- Instead of: <img src="https://example.com/banner.png"> -->
<img src="cid:banner.png" alt="banner">
The image is then attached to the email as a MIME part with a matching Content-ID header (banner.png). The platform supports CID image references natively in scenario templates.
Note: Microsoft Graph API-based programmatic trust configuration for this use case is currently under investigation and is not yet available as a supported solution.
¶ Basic SMTP
Basic SMTP allows you to send phishing emails through any standard SMTP relay.
Configuration fields:
- SMTP server hostname
- Port (25, 465, or 587)
- Username and password
- TLS/SSL settings
Note: SMTP delivery is subject to your mail server's spam filters and rate limits. For best results, use a dedicated sending server with proper SPF/DKIM/DMARC records.
¶ Red Team SMTP
Red Team SMTP is an enhanced SMTP integration designed for advanced red team engagements. It provides additional control over email headers, delivery timing, and evasion techniques.
¶ Moodle Integration
Moodle integration connects the platform to a Moodle learning management system for security awareness training.
When enabled, the Formation tab in the sidebar becomes active, providing:
- An advanced training dashboard
- Course assignment based on campaign results
- Tracking of employee training completion
Note: Without Moodle integration, the Formation page displays: "To access this tab, please enable the Moodle integration." with a link to the Integrations page.
¶ Webhooks
Webhooks send real-time events to an external URL. See the dedicated Webhooks page.
¶ Domains
Phishing domains are managed in the Domains tab. See the dedicated Domains page.
This is the IMAP side of reporting. For the full reporting feature (one-click add-in, Microsoft and Google reporting), see Reporting.
¶ Reporting Settings
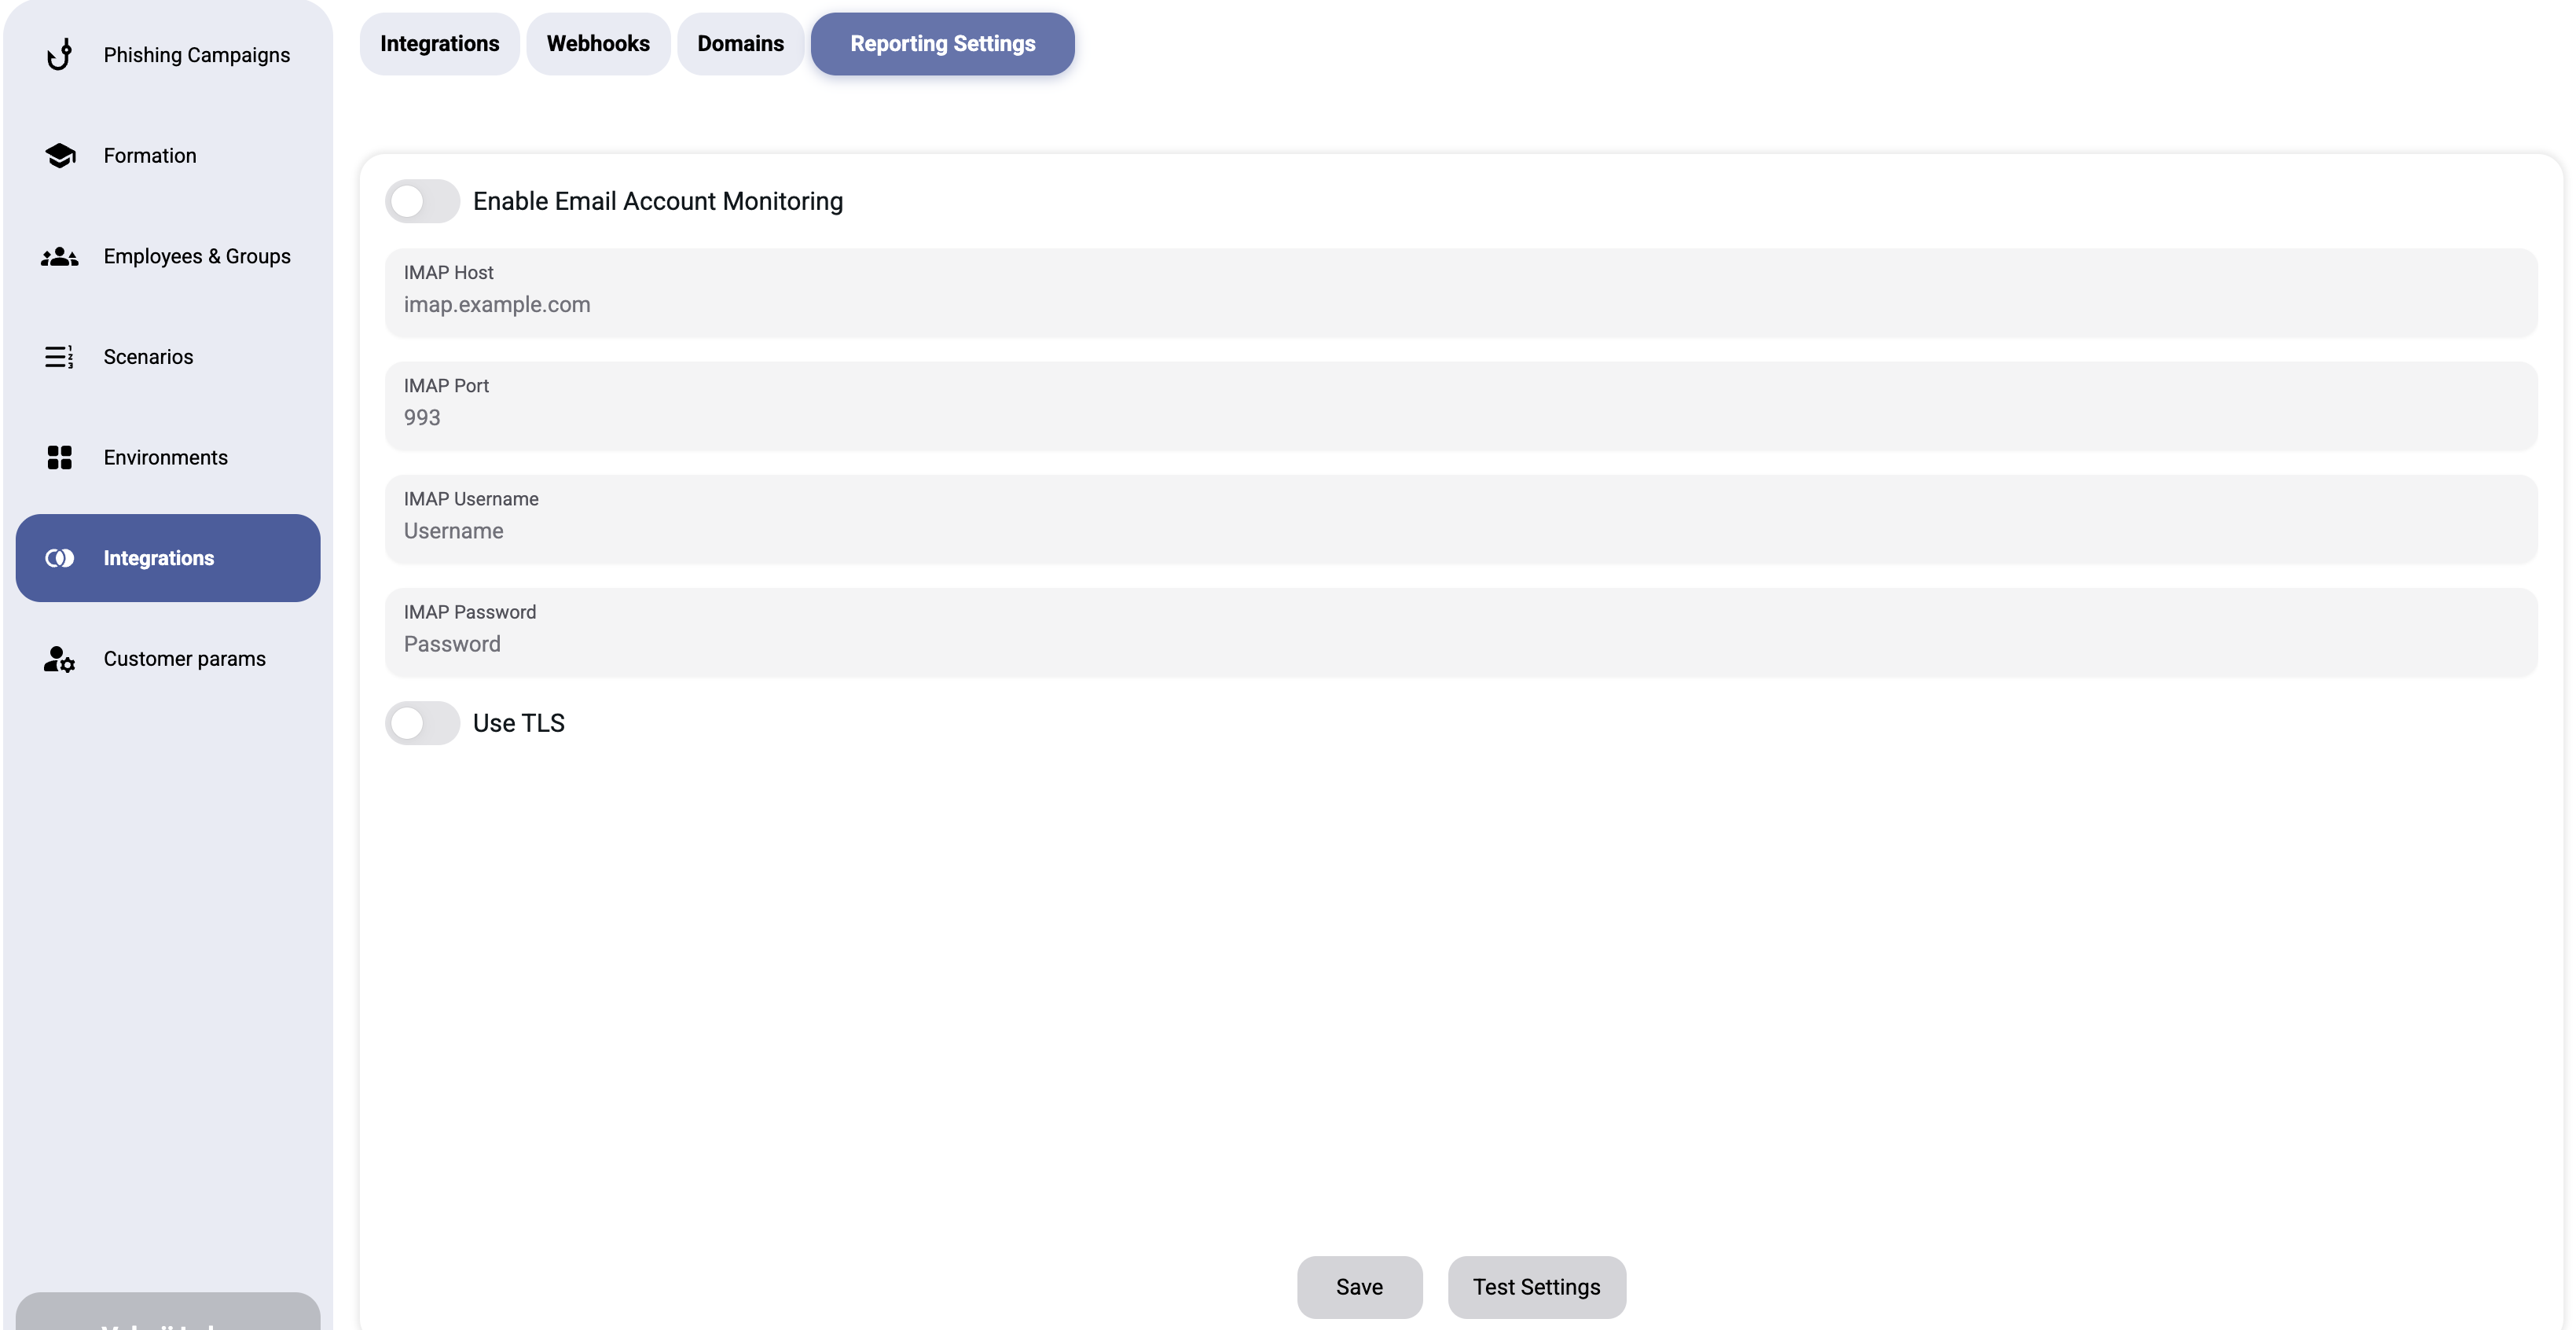
The Reporting Settings tab configures IMAP monitoring for a dedicated mailbox where employees can report suspected phishing emails.
¶ Configuration Fields
| Field | Description |
|---|---|
| Enable Email Account Monitoring | Master toggle to enable/disable IMAP monitoring |
| IMAP Host | Mail server hostname (e.g., imap.example.com) |
| IMAP Port | Server port (default: 993 for SSL) |
| IMAP Username | Mailbox username |
| IMAP Password | Mailbox password |
| Use TLS | Toggle TLS/SSL encryption |
¶ How It Works
- Employees forward suspicious emails to a dedicated reporting address
- The platfrom monitors this mailbox via IMAP
- Reported emails are matched against active campaigns
- The reporting event is recorded in campaign results
- Employees who report correctly improve their security score
Tip: Encourage employees to report suspicious emails. A high report rate is one of the strongest indicators of a security-aware workforce.
¶ Microsoft 365 setup
The Microsoft 365 connectors (user sync, mailbox injection / DMI, …) are installed through an admin-consent flow:
- On the Microsoft integration card, click Install and choose the options you need.
- The platform generates an admin-consent link.
- Open the link as a Microsoft 365 global administrator of the target tenant and grant consent to the requested permissions.
- After consent you are redirected back and the integration becomes active.
If you are not a tenant administrator, send the generated link to one. Consent must be granted by someone allowed to approve application permissions for the tenant.
For phishing reporting with this connector, see Reporting.
¶ Google Workspace setup
The Google Workspace connectors (user sync, mailbox injection / DMI, …) are installed through an OAuth admin-consent flow:
- On the Google integration card, click Install and choose the options you need.
- The platform generates a Google consent link.
- Open the link as a Google Workspace super administrator and approve the requested scopes (domain-wide delegation).
- After approval you are redirected back and the integration becomes active.
Approval must be done by a Google Workspace administrator allowed to grant API access for the domain.
For phishing reporting with this connector, see Reporting.